2026年3月1日 星期日

GOOGLE不小心按了改成韓文,改變語言設定


好奇點了上面的其他語言版本,結果搞了一會才改回中文,提供修改流程給需要的人


2025年6月1日 星期日

visual studio python 有中文就失敗 編碼錯誤

因為找到的解法是簡體中文,所以這裡提供繁體中文版的


工具-->自訂

命令-->功能表列-->檔案-->加入命令-->檔案-->進階儲存選項-->確定


錯誤訊息很長,但實測就是有中文就會跳錯誤

----------------------------------------------------------------------

 Traceback (most recent call last):

  File "C:\Users\vincent\AppData\Local\Programs\Python\Python311\Lib\runpy.py", line 198, in _run_module_as_main

    return _run_code(code, main_globals, None,

           ^^^^^^^^^^^^^^^^^^^^^^^^^^^^^^^^^^^

  File "C:\Users\vincent\AppData\Local\Programs\Python\Python311\Lib\runpy.py", line 88, in _run_code

    exec(code, run_globals)

  File "c:\program files\microsoft visual studio\2022\community\common7\ide\extensions\microsoft\python\core\debugpy\adapter/../..\debugpy\launcher/../..\debugpy\__main__.py", line 39, in <module>

    cli.main()

  File "c:\program files\microsoft visual studio\2022\community\common7\ide\extensions\microsoft\python\core\debugpy\adapter/../..\debugpy\launcher/../..\debugpy/..\debugpy\server\cli.py", line 430, in main

    run()

  File "c:\program files\microsoft visual studio\2022\community\common7\ide\extensions\microsoft\python\core\debugpy\adapter/../..\debugpy\launcher/../..\debugpy/..\debugpy\server\cli.py", line 284, in run_file

    runpy.run_path(target, run_name="__main__")

  File "c:\program files\microsoft visual studio\2022\community\common7\ide\extensions\microsoft\python\core\debugpy\_vendored\pydevd\_pydevd_bundle\pydevd_runpy.py", line 320, in run_path

0x1 執行緒以返回碼 0 (0x0) 結束。

    code, fname = _get_code_from_file(run_name, path_name)

                  ^^^^^^^^^^^^^^^^^^^^^^^^^^^^^^^^^^^^^^^^

  File "c:\program files\microsoft visual studio\2022\community\common7\ide\extensions\microsoft\python\core\debugpy\_vendored\pydevd\_pydevd_bundle\pydevd_runpy.py", line 294, in _get_code_from_file

    code = compile(f.read(), fname, 'exec')

           ^^^^^^^^^^^^^^^^^^^^^^^^^^^^^^^^

  File "C:\Users\vincent\source\repos\PythonApplication0327\PythonApplication0327\PythonApplication0327.py", line 1

    print("123  @")

                  ^

SyntaxError: (unicode error) 'utf-8' codec can't decode byte 0xa4 in position 4: invalid start byte

'python.exe' 程式以返回碼 4294967295 (0xffffffff) 結束。

2024年1月13日 星期六

Arduino 網頁控制紅外線發射 增加網頁按鈕

 #include <ESP8266WiFi.h>


#include <Arduino.h>
#include <IRremoteESP8266.h>
#include <IRsend.h>

const uint16_t kIrLed = 4;  // ESP8266 GPIO pin to use. Recommended: 4 (D2).
IRsend irsend(kIrLed);  // Set the GPIO to be used to sending the message.

#ifndef STASSID
#define STASSID "POCO X3 Pro"
#define STAPSK "66666666"
#endif

const char* ssid = STASSID;
const char* password = STAPSK;

// Create an instance of the server
// specify the port to listen on as an argument
WiFiServer server(80);

void setup() {
  Serial.begin(115200);

  irsend.begin();

  // prepare LED
  pinMode(LED_BUILTIN, OUTPUT);
  digitalWrite(LED_BUILTIN, 0);

  // Connect to WiFi network
  Serial.println();
  Serial.println();
  Serial.print(F("Connecting to "));
  Serial.println(ssid);

  WiFi.mode(WIFI_STA);
  WiFi.begin(ssid, password);

  while (WiFi.status() != WL_CONNECTED) {
    delay(500);
    Serial.print(F("."));
  }
  Serial.println();
  Serial.println(F("WiFi connected"));

  // Start the server
  server.begin();
  Serial.println(F("Server started"));

  // Print the IP address
  Serial.println(WiFi.localIP());
}

void loop() {
  // Check if a client has connected
  WiFiClient client = server.accept();
  if (!client) { return; }
  Serial.println(F("new client"));

  client.setTimeout(5000);  // default is 1000

  // Read the first line of the request
  String req = client.readStringUntil('\r');
  Serial.println(F("request: "));
  Serial.println(req);

  // Match the request
  int val,IR;
  if (req.indexOf(F("/gpio/0")) != -1) {
    val = 0;
  } else if (req.indexOf(F("/gpio/1")) != -1) {
    val = 1;}
    else if (req.indexOf(F("/IRon")) != -1)
    {IR = 0;
    Serial.println("NEC");
    irsend.sendNEC(0xCF20D);
    }
    else if (req.indexOf(F("/IRoff")) != -1)
    {IR = 1;
    }
    else {
    Serial.println(F("invalid request"));
    val = digitalRead(LED_BUILTIN);
  }

  // Set LED according to the request
  digitalWrite(LED_BUILTIN, val);

  // read/ignore the rest of the request
  // do not client.flush(): it is for output only, see below
  while (client.available()) {
    // byte by byte is not very efficient
    client.read();
  }

  // Send the response to the client
  // it is OK for multiple small client.print/write,
  // because nagle algorithm will group them into one single packet
  client.print(F("HTTP/1.1 200 OK\r\nContent-Type: text/html\r\n\r\n<!DOCTYPE HTML>\r\n<html>\r\n"));
  client.print(WiFi.localIP());
  client.print(F("This hostname:\n"));//读取当前的hostname并输出
  client.print(WiFi.hostname());
  client.print(F("&nbsp;"));
  client.print(F("GPIO is now "));
  client.print((val) ? F("high") : F("low"));

  client.print(F("&nbsp;"));
  client.print(F("Click <a href='http://"));
  client.print(WiFi.localIP());
  client.print(F("/gpio/0'>here</a> to switch LED GPIO on, or <a href='http://"));
  client.print(WiFi.localIP());
  client.print(F("/gpio/1'>here</a> to switch LED GPIO off. Or <a href='http://"));
  client.print(WiFi.localIP());
  client.print(F("/IRon'>here</a> to send IR on."));

  client.print(F("<br><br>"));
  client.print(F("192.168.179.146"));
  client.print(F("&nbsp;"));
  client.print(F("Click <a href='http://"));
  client.print(F("192.168.179.146"));
  client.print(F("/gpio/0'>here</a> to switch LED GPIO on, or <a href='http://"));
  client.print(F("192.168.179.146"));
  client.print(F("/gpio/1'>here</a> to switch LED GPIO off. Or <a href='http://"));
  client.print(F("192.168.179.146"));
  client.print(F("/IRon'>here</a> to send IR on."));

  client.print(F("&nbsp;"));
  client.print(F(" <p><a href=\"/192.168.179.146/IRon\">"));
  client.print(F(" <button class=\"button\"  style=\"width:360px;height:120px;font-size:40px;background-color:green;\" >ON</button></a> "));
  client.print(F(" <a href=\"/192.168.179.146/IRoff\">"));
  client.print(F(" <button class=\"button\"  style=\"width:360px;height:120px;font-size:40px;background-color:red;\" >OFF</button></a></p> "));

  client.print(F("<br><br>"));
  client.print(F("192.168.179.246"));
  client.print(F("&nbsp;"));
  client.print(F("Click <a href='http://"));
  client.print(F("192.168.179.246"));
  client.print(F("/gpio/0'>here</a> to switch LED GPIO on, or <a href='http://"));
  client.print(F("192.168.179.246"));
  client.print(F("/gpio/1'>here</a> to switch LED GPIO off. Or <a href='http://"));
  client.print(F("192.168.179.246"));
  client.print(F("/IRon'>here</a> to send IR on."));

  client.print(F("&nbsp;"));
  client.print(F(" <p><a href=\"/192.168.179.146/IRon\">"));
  client.print(F(" <button class=\"button\"  style=\"width:360px;height:120px;font-size:40px;background-color:green;\" >ON</button></a> "));
  client.print(F(" <a href=\"/192.168.179.146/IRoff\">"));
  client.print(F(" <button class=\"button\"  style=\"width:360px;height:120px;font-size:40px;background-color:red;\" >OFF</button></a></p> "));

  client.print(F("</html>"));

  // The client will actually be *flushed* then disconnected
  // when the function returns and 'client' object is destroyed (out-of-scope)
  // flush = ensure written data are received by the other side
  Serial.println(F("Disconnecting from client"));
}

2024年1月10日 星期三

Arduino 多台網頁互控發射紅外線 [架構說明]

固定IP 多個webserver


每個Arduino都開啟一個webServer

每個webServer都能夠接收超連結網址

所以無論是開關都是輸入網址

也就是沒有網頁其實也能藉由背好的網址控制。


但是這些Arduino必須在同一個WiFi下,

也就是同個區網內,

才能彼此互相靠網址溝通。


所以client只要是能連上那個WiFi,再有瀏覽器就能操控所有Arduino

Arduino HTML 按鈕超連結

參考

https://sites.google.com/view/rayarduino/esp32-web-server_two_leds 


<HTML>

<HEAD>

<TITLE>語法練習版</TITLE>

</HEAD>

<BODY>


<input type="button" value="ON" style="width:120px;height:40px;font-size:20px;background-color:green;"  onclick="location.href='你要前往的網址'">

<input type="button" value="OFF" style="width:120px;height:40px;font-size:20px;background-color:red;"  onclick="location.href='你要前往的網址'">


</BODY>

</HTML>

這段不知怎融合Arduino

------------------------------------------------------------------------------------------------------------

Arduino可用 參考連結融合

  client.print(F("&nbsp;"));
  client.print(F(" <p><a href=\"/192.168.179.146/IRon\">"));
  client.print(F(" <button class=\"button\"  style=\"width:360px;height:120px;font-size:40px;background-color:green;\" >ON</button></a> "));
  client.print(F(" <a href=\"/192.168.179.146/IRoff\">"));
  client.print(F(" <button class=\"button\"  style=\"width:360px;height:120px;font-size:40px;background-color:red;\" >OFF</button></a></p> "));


2023年10月5日 星期四

Arduino 多台 網頁互控紅外線 固定IP 多webserver

實現控制多個發射遙控器訊號的初版

以WiFiManualWebServer範例當基底,融合紅外線發射

因為找不到比網頁更方便的範例來開發

畢竟UI部分,也很難找到比網頁更方便的方式


#include <ESP8266WiFi.h>


#include <Arduino.h>
#include <IRremoteESP8266.h>
#include <IRsend.h>

const uint16_t kIrLed = 4;  // ESP8266 GPIO pin to use. Recommended: 4 (D2).
IRsend irsend(kIrLed);  // Set the GPIO to be used to sending the message.

#ifndef STASSID
#define STASSID "你的WIFI名稱"
#define STAPSK "你的WIFI密碼"
#endif

const char* ssid = STASSID;
const char* password = STAPSK;

// Create an instance of the server
// specify the port to listen on as an argument
WiFiServer server(80);

void setup() {
  Serial.begin(115200);

  irsend.begin();

  // prepare LED
  pinMode(LED_BUILTIN, OUTPUT);
  digitalWrite(LED_BUILTIN, 0);

  // Connect to WiFi network
  Serial.println();
  Serial.println();
  Serial.print(F("Connecting to "));
  Serial.println(ssid);

  WiFi.mode(WIFI_STA);
  WiFi.begin(ssid, password);

  while (WiFi.status() != WL_CONNECTED) {
    delay(500);
    Serial.print(F("."));
  }
  Serial.println();
  Serial.println(F("WiFi connected"));

  // Start the server
  server.begin();
  Serial.println(F("Server started"));

  // Print the IP address
  Serial.println(WiFi.localIP());
}

void loop() {
  // Check if a client has connected
  WiFiClient client = server.accept();
  if (!client) { return; }
  Serial.println(F("new client"));

  client.setTimeout(5000);  // default is 1000

  // Read the first line of the request
  String req = client.readStringUntil('\r');
  Serial.println(F("request: "));
  Serial.println(req);

  // Match the request
  int val,IR;
  if (req.indexOf(F("/gpio/0")) != -1) {
    val = 0;
  } else if (req.indexOf(F("/gpio/1")) != -1) {
    val = 1;}
    else if (req.indexOf(F("/IRon")) != -1)
    {IR = 0;
    Serial.println("NEC");
    irsend.sendNEC(0xCF20D);
    }
    else if (req.indexOf(F("/IRclose")) != -1)
    {IR = 1;}
    else {
    Serial.println(F("invalid request"));
    val = digitalRead(LED_BUILTIN);
  }

  // Set LED according to the request
  digitalWrite(LED_BUILTIN, val);

  // read/ignore the rest of the request
  // do not client.flush(): it is for output only, see below
  while (client.available()) {
    // byte by byte is not very efficient
    client.read();
  }

  // Send the response to the client
  // it is OK for multiple small client.print/write,
  // because nagle algorithm will group them into one single packet
  client.print(F("HTTP/1.1 200 OK\r\nContent-Type: text/html\r\n\r\n<!DOCTYPE HTML>\r\n<html>\r\n"));
  client.print(WiFi.localIP());
  client.print(F("This hostname:\n"));//读取当前的hostname并输出
  client.print(WiFi.hostname());
  client.print(F("&nbsp;"));
  client.print(F("GPIO is now "));
  client.print((val) ? F("high") : F("low"));

  client.print(F("&nbsp;"));
  client.print(F("Click <a href='http://"));
  client.print(WiFi.localIP());
  client.print(F("/gpio/0'>here</a> to switch LED GPIO on, or <a href='http://"));
  client.print(WiFi.localIP());
  client.print(F("/gpio/1'>here</a> to switch LED GPIO off. Or <a href='http://"));
  client.print(WiFi.localIP());
  client.print(F("/IRon'>here</a> to send IR on."));

  client.print(F("<br><br>"));
  client.print(F("192.168.179.146"));
  client.print(F("&nbsp;"));
  client.print(F("Click <a href='http://"));
  client.print(F("192.168.179.146"));
  client.print(F("/gpio/0'>here</a> to switch LED GPIO on, or <a href='http://"));
  client.print(F("192.168.179.146"));
  client.print(F("/gpio/1'>here</a> to switch LED GPIO off. Or <a href='http://"));
  client.print(F("192.168.179.146"));
  client.print(F("/IRon'>here</a> to send IR on."));

  client.print(F("<br><br>"));
  client.print(F("192.168.179.246"));
  client.print(F("&nbsp;"));
  client.print(F("Click <a href='http://"));
  client.print(F("192.168.179.246"));
  client.print(F("/gpio/0'>here</a> to switch LED GPIO on, or <a href='http://"));
  client.print(F("192.168.179.246"));
  client.print(F("/gpio/1'>here</a> to switch LED GPIO off. Or <a href='http://"));
  client.print(F("192.168.179.246"));
  client.print(F("/IRon'>here</a> to send IR on.</html>"));


  // The client will actually be *flushed* then disconnected
  // when the function returns and 'client' object is destroyed (out-of-scope)
  // flush = ensure written data are received by the other side
  Serial.println(F("Disconnecting from client"));
}

2023年9月23日 星期六

Arduino 簡易訊號偵測,紅外線拼接

 void setup() {

  // put your setup code here, to run once:
  Serial.begin(9600);
  pinMode(5,INPUT);
}

void loop() {
  // put your main code here, to run repeatedly:
  delay(100); //延遲毫秒
  if(digitalRead(5)==0) //0=LOW
  // If no signal print collision detected
  Serial.println("Balls");
  if(digitalRead(5)==1) //1=HIGH
  //else
  // 11 If signal detected print collision detected
  Serial.println("No Balls.");
}

2023年9月17日 星期日

Arduino WeMos D1 R3 [入門] 開發板上控制製造呼吸燈

選板子

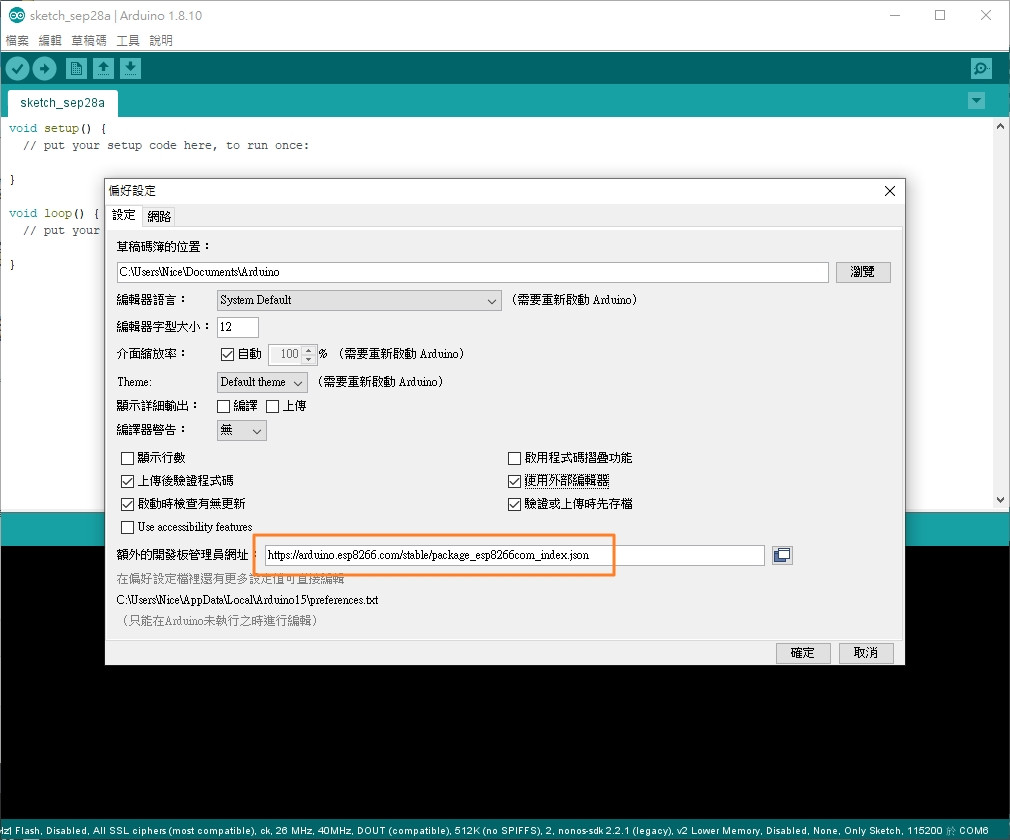
選板子前要先安裝ESP8266

打開 Arduino IDE,菜單 / 偏好設定,額外的開發板管理員網址打上:https://arduino.esp8266.com/stable/package_esp8266com_index.json
  1. https://ithelp.ithome.com.tw/upload/images/20190928/20120058J9MrrmsjkR.jpg

安裝ESP8266的方法


void setup() {
  // put your setup code here, to run once:
  Serial.begin(115200);
  pinMode(LED_BUILTIN, OUTPUT);    //必要
}

void loop() {
  // put your main code here, to run repeatedly:
  digitalWrite(LED_BUILTIN, 1);
  delay(1000);
  digitalWrite(LED_BUILTIN, 0);
  delay(1000);    //必要不然迴圈會導致看不到效果
}


2023年9月13日 星期三

印加寶藏 機率自動化進行

本來想自稱AI

不過實際上只有加點機率

實現單人可以遊玩

機率電腦是固定數量的

https://scratch.mit.edu/projects/879030558/

2023年7月24日 星期一

Arduino WeMos R2 [入門] 兩個按鈕控制

參考
ESP8266作为arduino D1 wifi模块应用时引脚序号说明(与UNO对比异同)2.5.0版本开发板库


const int BUTTON_PIN1 = 16;  // 按鍵的接腳
const int BUTTON_PIN2 = 5;  // 按鍵的接腳

int buttonState1 = 0;   // 按鈕的狀態
int buttonState2 = 0;   // 按鈕的狀態

void setup() {
  Serial.begin(9600);
  pinMode(BUTTON_PIN1, INPUT_PULLUP);
  pinMode(BUTTON_PIN2, INPUT_PULLUP); //設定按鈕的接腳為輸入,因為我們要讀取它的狀態
}

void loop() {
  buttonState1 = digitalRead(BUTTON_PIN1);  //讀取按鍵的狀態
  buttonState2 = digitalRead(BUTTON_PIN2);
  /*
  if(buttonState1 == LOW){          //如果按鍵按了
    Serial.println("16BUTTON");
  }
  if(buttonState2 == LOW){          //如果按鍵按了
    Serial.println("5BUTTON");
  }
  */
  if(buttonState1 == HIGH){          //如果按鍵按了
    Serial.println("16BUTTON");
  }
  if(buttonState2 == HIGH){          //如果按鍵按了
    Serial.println("5BUTTON");
  }
 
}

2023年7月23日 星期日

Arduino WeMos R2 遙控器複製拷貝自造 紅外線發射接收復刻 無線網頁控制

目前功能,

連上WiFi後,用網頁控制Arduino發射紅外線,

WiFi無線控制有紅外線接收器的設備。


無線功能由WiFi傳輸,

所以需要一個WiFi基地台,

試驗時可用手機分享基地台熱點當作WiFi主機(基地台)。


Arduino連上WiFi後,

創建一個WiFiWebServer,

這WebServer可用網址後綴來接收控制。


主要 WiFiManualWebServer

接收 IRrecvDump

發射 IRremoteESP8266: IRsendDemo

------------------------

主要 WiFiManualWebServer

接收 IRrecvDump

發射 IRremoteESP8266: IRsendDemo


/*
    This sketch demonstrates how to set up a simple HTTP-like server.
    The server will set a GPIO pin depending on the request
      http://server_ip/gpio/0 will set the GPIO2 low,
      http://server_ip/gpio/1 will set the GPIO2 high
    server_ip is the IP address of the ESP8266 module, will be
    printed to Serial when the module is connected.
*/

#include <ESP8266WiFi.h>

#include <Arduino.h>
#include <IRremoteESP8266.h>
#include <IRsend.h>

const uint16_t kIrLed = 4;  // ESP8266 GPIO pin to use. Recommended: 4 (D2).
IRsend irsend(kIrLed);  // Set the GPIO to be used to sending the message.

#ifndef STASSID
#define STASSID "你的WIFI SSID"
#define STAPSK "你的WIFI密碼"
#endif

const char* ssid = STASSID;
const char* password = STAPSK;

// Create an instance of the server
// specify the port to listen on as an argument
WiFiServer server(80);

void setup() {
 

  irsend.begin();
#if ESP8266
  Serial.begin(115200, SERIAL_8N1, SERIAL_TX_ONLY);
#else  // ESP8266
  Serial.begin(115200, SERIAL_8N1);
#endif  // ESP8266


  // prepare LED
  pinMode(LED_BUILTIN, OUTPUT);
  digitalWrite(LED_BUILTIN, 0);

  // Connect to WiFi network
  Serial.println();
  Serial.println();
  Serial.print(F("Connecting to "));
  Serial.println(ssid);

  WiFi.mode(WIFI_STA);
  WiFi.begin(ssid, password);

  while (WiFi.status() != WL_CONNECTED) {
    delay(500);
    Serial.print(F("."));
  }
  Serial.println();
  Serial.println(F("WiFi connected"));

  // Start the server
  server.begin();
  Serial.println(F("Server started"));

  // Print the IP address
  Serial.println(WiFi.localIP());
}

void loop() {
  // Check if a client has connected
  WiFiClient client = server.accept();
  if (!client) { return; }
  Serial.println(F("new client"));

  client.setTimeout(5000);  // default is 1000

  // Read the first line of the request
  String req = client.readStringUntil('\r');
  Serial.println(F("request: "));
  Serial.println(req);

  // Match the request
  int val,IR;
  if (req.indexOf(F("/gpio/0")) != -1)
    {val = 0;}
  else if (req.indexOf(F("/gpio/1")) != -1)
    {val = 1;}
  else if (req.indexOf(F("/IRsend")) != -1)
    {IR = 0;
    Serial.println("NEC");
    irsend.sendNEC(0xCF20D);
    }
  else if (req.indexOf(F("/IRclose")) != -1)
    {IR = 1;}  
  else {
    Serial.println(F("invalid request"));
    val = digitalRead(LED_BUILTIN);
  }

  // Set LED according to the request
  digitalWrite(LED_BUILTIN, val);

  // read/ignore the rest of the request
  // do not client.flush(): it is for output only, see below
  while (client.available()) {
    // byte by byte is not very efficient
    client.read();
  }

  // Send the response to the client
  // it is OK for multiple small client.print/write,
  // because nagle algorithm will group them into one single packet
  client.print(F("HTTP/1.1 200 OK\r\nContent-Type: text/html\r\n\r\n<!DOCTYPE HTML>\r\n<html>\r\nGPIO is now "));
  client.print((val) ? F("high") : F("low"));
  client.print(F("<br><br>Click <a href='http://"));
  client.print(WiFi.localIP());
  client.print(F("/gpio/1'>here</a> to switch LED GPIO on, or <a href='http://"));
  client.print(WiFi.localIP());
  client.print(F("/gpio/0'>here</a> to switch LED GPIO off.<a href='http://"));
  client.print(WiFi.localIP());
  client.print(F("/IRsend'>here</a> to send IR.</html>"));

  // The client will actually be *flushed* then disconnected
  // when the function returns and 'client' object is destroyed (out-of-scope)
  // flush = ensure written data are received by the other side
  Serial.println(F("Disconnecting from client"));
}

GOOGLE不小心按了改成韓文,改變語言設定

  好奇點了上面的其他語言版本,結果搞了一會才改回中文,提供修改流程給需要的人